How to Fix a Hole in Your Puffer Jacket Discreetly Without Ruining Its Look
by Emily Jannet on Apr 07, 2025
When you're out and about in your favourite puffer jacket, the last thing you want is for it to get damaged. Whether you're tackling a brisk walk through the countryside or just making your way through the hustle and bustle of city life, your jacket is your trusty companion in all kinds of weather. But sometimes, a small mishap can leave you with an unwanted hole. Don’t panic! With a few simple steps, you can repair that hole discreetly, without ruining the look of your beloved jacket.
Why It’s Important to Repair Your Puffer Jacket Properly
Puffer jackets are popular for their warmth and comfort, but they do require a bit of care to keep them looking their best. Unlike regular jackets, which may just need a quick patch, repairing a puffer jacket needs a bit more finesse. That’s because these jackets are typically filled with down or synthetic insulation, which provides that all-important warmth. If the fabric is torn and left untreated, you risk losing insulation, and your jacket may no longer provide the protection you need.
But don’t worry! There’s no need to send it off for expensive repairs. With a quick fix, your puffer jacket can be as good as new, and you can continue wearing it through all seasons.
Step-by-Step Guide to Fixing a Hole in Your Puffer Jacket
-
Assess the Damage
Before you begin, take a moment to carefully inspect the hole. Is it a small tear in the outer fabric, or has it punctured all the way through to the insulation? Understanding the extent of the damage will help you decide the best method for fixing it.
-
Choose the Right Repair Patch
The key to a discreet and effective repair is choosing the right materials. Traditional sewing might work for some types of damage, but it’s not always the best option for a puffer jacket. Puffer jackets are often made from delicate, lightweight fabrics that don’t hold up well to the heavy stitching required for a traditional repair. Plus, sewing could result in visible thread marks or cause more damage to the fabric.
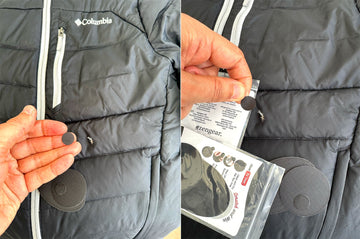
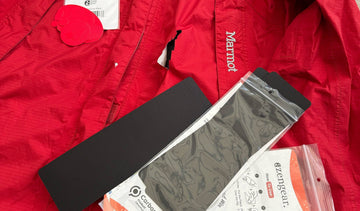
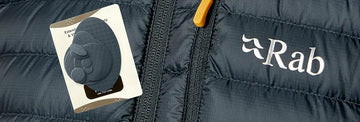
For a much easier and quicker solution, consider using Puffer Jacket Repair Patches - Waterproof, Self-Adhesive, Tear-Cold-Heat-Resistant. These patches are a game-changer when it comes to fixing small holes and tears in your jacket without compromising its look or functionality. The self-adhesive backing makes them incredibly easy to apply, and the patches are designed to blend in seamlessly with the jacket’s fabric, so you won’t even notice they’re there.
-
Clean the Area Around the Hole
Before you apply the patch, make sure the area around the hole is clean and dry. Use a soft cloth or sponge to gently wipe away any dirt or debris. This will ensure that the patch sticks properly and doesn’t peel off later.
-
Cut the Patch to Size
If the hole is particularly large, you might need to trim the patch down to fit. Simply measure the area around the hole and cut the patch to match. It’s better to go slightly larger than smaller, as you want the patch to cover the entire damaged area. The Puffer Jacket Repair Patches come in various sizes, making it easy to find the perfect fit for your needs.
-
Apply the Patch
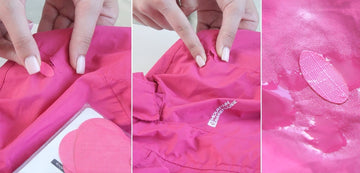
Now it’s time for the magic to happen! Peel the backing off the Puffer Jacket Repair Patch, and carefully place it over the hole. Press down firmly to ensure the patch sticks. These patches are self-adhesive, which means they’ll stay in place without any need for extra adhesive or sewing. The waterproof, tear-resistant material ensures that your jacket is just as durable and functional as before.
-
Smooth It Out
Once the patch is in place, use your fingers to smooth it out and make sure it’s securely attached. If there are any air bubbles or creases, gently press them out to ensure the patch lies flat against the fabric. The best part is that these patches are designed to be discreet and blend with the fabric, so no one will know you’ve made a repair.
-
Leave It to Set
While the patch will stick immediately, it’s always a good idea to give it a bit of time to fully set before you wear the jacket again. A couple of hours should be enough for the adhesive to bond properly with the fabric.
Why Choose Puffer Jacket Repair Patches?
You might be wondering, why should you choose Puffer Jacket Repair Patches - Waterproof, Self-Adhesive, Tear-Cold-Heat-Resistant over other methods like sewing or using regular fabric patches? Well, here are a few reasons why these patches are the ideal solution:
-
Quick and Easy: No sewing, no mess. Simply peel and stick the patch in place. It’s that easy!
-
Durable and Long-Lasting: The waterproof and tear-resistant material ensures that your jacket will continue to perform just as well as it did before the damage.
-
Discreet: The patches are designed to blend in with your jacket’s fabric, so your repair won’t be obvious to anyone else.
-
Versatile: These patches are perfect for all sorts of outdoor gear, not just puffer jackets. They can also be used on tents, sleeping bags, backpacks, and more.
Repairing a hole in your puffer jacket doesn’t have to be a stressful or time-consuming task. With the right tools, like Puffer Jacket Repair Patches - Waterproof, Self-Adhesive, Tear-Cold-Heat-Resistant, you can make your jacket as good as new in no time. Whether you’re out on a hike, heading to work, or just enjoying a weekend stroll, your jacket will continue to keep you warm and cosy, looking as stylish as ever.
So next time you notice a hole, don’t panic. With a quick and easy patch, your puffer jacket will be ready for whatever adventures come your way!