How to Fix Your Patagonia Down Jacket with aZengear Down Jacket Repair Patches
by Emily Jannet on May 24, 2024
Your Patagonia down jacket has been your trusty companion through countless adventures, keeping you warm and protected from the elements. However, over time, wear and tear can take its toll, leaving your beloved jacket with unsightly rips and tears. Fortunately, with the help of aZengear Down Jacket Repair Patches, you can easily restore your jacket to its former glory. In this guide, we'll walk you through the steps to effectively fix rips in your Patagonia down jacket using these innovative patches.
About aZengear Down Jacket Repair Patches
Before we dive into the repair process, let's take a moment to understand what makes aZengear Down Jacket Repair Patches so effective. These patches are specifically designed to adhere to the fabric of your down jacket, providing a durable and long-lasting solution to tears and holes. Made from high-quality materials, they offer excellent adhesion and flexibility, ensuring that your repairs withstand the rigors of outdoor adventures.
Step 1: Assessing the Damage
The first step in repairing your Patagonia down jacket is to assess the extent of the damage. Carefully examine the affected area, noting any tears, holes, or frayed edges. It's essential to thoroughly clean the area around the damage to ensure proper adhesion of the repair patch.
Step 2: Preparing the Surface
Once you've identified the damaged area, it's time to prepare the surface for repair. Use a mild detergent and water to gently clean the area, removing any dirt, grime, or debris. Allow the fabric to dry completely before proceeding to the next step.
Step 3: Applying the Patch
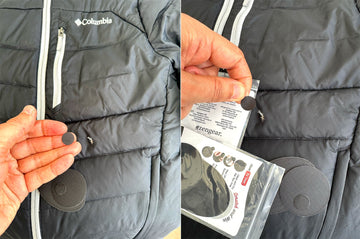
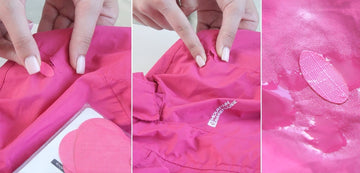
Now it's time to apply the aZengear Down Jacket Repair Patch. Carefully peel the backing from the patch, exposing the adhesive side. Position the patch over the damaged area, ensuring that it covers the entire tear or hole. Press down firmly on the patch, applying even pressure to ensure proper adhesion.
Step 4: Securing the Patch
Once the patch is in place, it's essential to secure it properly to ensure a strong bond. Use the edge of a clean cloth or your fingertips to press down firmly on the patch, smoothing out any air bubbles or wrinkles. Pay particular attention to the edges of the patch, ensuring that they are securely adhered to the fabric.
Step 5: Allowing Proper Cure Time
After applying the patch, allow sufficient time for it to cure fully. This typically involves letting the patch sit undisturbed for some time to ensure maximum adhesion and durability.
Step 6: Testing the Repair
Once the patch has cured, it's time to test the repair to ensure its effectiveness. Gently tug on the edges of the patch to ensure that it is securely adhered to the fabric. Additionally, perform a visual inspection of the repaired area to ensure that there are no signs of lifting or peeling.
Step 7: Enjoying Your Restored Jacket
With the repair complete, you can now enjoy your restored Patagonia down jacket with confidence. Whether you're hitting the slopes, exploring the backcountry, or simply running errands around town, you can trust that your jacket is ready to keep you warm and protected from whatever Mother Nature throws your way.
In the world of outdoor gear, a reliable down jacket is worth its weight in gold. When wear and tear start to show, it's reassuring to know that solutions like aZengear Down Jacket Repair Patches exist. By following the steps outlined in this guide, you can seamlessly mend your beloved Patagonia down jacket and prolong its lifespan, allowing you to continue exploring the great outdoors in comfort and style. With the right tools and a little bit of care, you can ensure that your jacket remains a faithful companion for many more adventures to come.