How to Patch a Hole in a Tent Using Repair Patches: A Step-by-Step Guide
by Emily Jannet on Sep 16, 2024
Camping is a wonderful way to connect with nature, but nothing can ruin your adventure faster than discovering a hole in your tent. A small tear or puncture can compromise your shelter, letting in wind, rain, bugs, or even cold air. Fortunately, repairing a hole in your tent is a straightforward process, especially if you have a tent repair patch kit. In this guide, we’ll walk you through everything you need to know about patching a hole in your tent, ensuring it’s ready for your next outdoor adventure.
Why Repair Your Tent?
Your tent is one of the most important pieces of camping gear, providing protection from the elements and a comfortable place to rest. Even minor damage can quickly escalate, leading to bigger rips or tears that are harder to fix. By promptly repairing any holes, you can extend the life of your tent, maintain its waterproofing, and save money in the long run.
What You’ll Need
To effectively patch a hole in your tent, you’ll need a few basic items. Most of these can be found in a standard tent repair kit, but you can also purchase them separately:
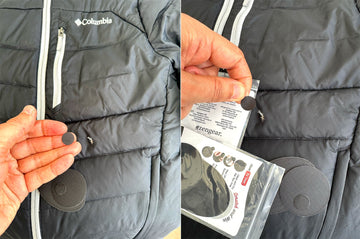
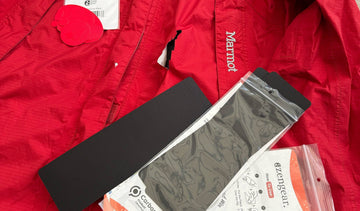
- Tent Repair Patch Kit: These kits usually include adhesive patches specifically designed for fabric repairs.
- Rubbing Alcohol or Cleaning Solution: Used to clean the area around the hole, ensuring proper adhesion of the patch.
- Scissors: To trim the patch to the right size and shape.
- Seam Sealer (optional): For waterproofing the edges of the patch, ensuring a tight seal against moisture.
Step-by-Step Guide to Patching a Tent Hole
-
Identify the Damage: Before you start, locate all holes or tears in your tent. Inspect the exterior and interior carefully, especially high-stress areas like zippers, seams, and corners. Make a note of any areas that need repair.
-
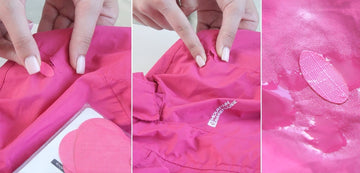
Clean the Area: Use rubbing alcohol or a mild cleaning solution to clean the area around the hole. Dirt, dust, and oils can prevent the patch from adhering properly, so make sure the fabric is clean and dry before proceeding. Avoid using harsh cleaners that could damage the tent fabric.
-
Cut the Patch to Size: Take one of the adhesive patches from your repair kit and cut it to size. The patch should be at least an inch larger than the hole on all sides to ensure a secure fit. Round the corners of the patch to help prevent peeling, as sharp corners are more likely to catch and lift.
-
Apply the Patch: Place the patch carefully over the hole, pressing down firmly to ensure it sticks. Start at the center and work your way outwards, smoothing out any bubbles or wrinkles. Some repair patches are designed to be applied to the inside of the tent, while others go on the outside—check the instructions with your patch kit for the best placement.
-
Press and Seal: Use a flat object like a credit card to press down on the patch, working out any air bubbles to ensure full contact between the patch and the tent fabric. Pressing firmly for a few minutes helps activate the adhesive and strengthens the bond.
-
Optional: Use Seam Sealer: To further waterproof the repair, apply a thin layer of seam sealer around the edges of the patch. This step is particularly useful if the hole is near a seam or if you’re camping in wet conditions. Allow the sealer to dry completely before packing up your tent.
-
Test the Repair: Once the patch is securely in place and any sealant has dried, set up your tent and inspect the repair. Gently press around the patch to ensure it’s fully adhered. If you’re concerned about waterproofing, consider testing it with a light spray of water to see if any moisture seeps through.
Additional Tips for Tent Repair
-
Choose the Right Patch: Most repair kits include patches made from durable, waterproof materials like nylon or polyester. For mesh areas of your tent, use mesh repair patches or consider stitching followed by seam sealer.
-
Keep a Repair Kit Handy: A small repair kit should be part of your standard camping gear. Patches, seam sealer, and even a small tube of tent-specific adhesive can save your trip if you encounter unexpected damage.
-
Repair Larger Tears with Tape First: For larger rips, use repair tape as an underlay before applying the patch. This provides additional support and helps hold the fabric together while the patch sets.
-
Regular Maintenance: Regularly inspect your tent for signs of wear and tear. Addressing small issues before they become big problems is key to extending the life of your tent.
Here you can also read about How to Repair Your Hiking Backpack By Using aZengear Repair Patches.
Patching a hole in your tent is a simple but essential skill that every camper should know. With the right tools and a little know-how, you can quickly and effectively repair your tent, ensuring that it remains a reliable shelter on all your outdoor adventures. So, don’t let a small tear spoil your trip—be prepared, act quickly, and keep your tent in great shape for years to come.