Repair Techniques for Millet Camping Gear with Self-Adhesive Patches
by Emily Jannet on Nov 07, 2025
Key Points
-
Address any holes or tears in your lightweight camping gear promptly to prevent insulation loss, water ingress or further damage.
-
Use proper self‑adhesive repair patches designed for outdoor fabrics to make a quick but effective fix on the trail.
-
Follow a step‑by‑step technique: clean the area, align the fabric, apply the patch and press firmly.
-
Choose the right patch size and location—round the edges, overlap the damage and avoid placing on high‑stress seams without reinforcement.
-
For fragile fabrics, seams or down‑filled gear, add extra support (like internal backing or stitching) and allow full cure before packing.
-
You can handle unexpected gear failure mid‑trip with minimal tools if you carry a compact kit of patches—this saves the trip and the gear.
-
The right repair patches make your gear last longer and maintain performance—nature doesn’t wait for a new jacket or shelter.
When you’re out in the wild carrying lightweight gear like down jackets, sleeping bags, tents or ski pants, damage can happen in a heartbeat—a snag from a branch, a sharp rock beneath a groundsheet, a careless zip. Especially with millet‑weight fabrics (i.e., ultralight, high‑performance gear that uses thin rip‑stop nylon, water‑resistant coatings, breathable membranes), the consequences of a small tear can be disproportionately large. Water can seep in, insulation can escape, and the protective shell of your kit fails.
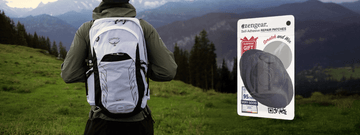
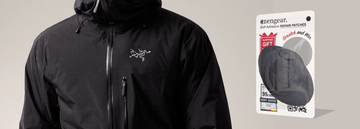
That’s where a proper repair method matters—and one that’s quick, reliable and uses purpose‑designed materials. In this article we’ll walk through how to repair your lightweight camping gear using self‑adhesive patches—specifically noting the excellent option offered by aZengear: Down Jacket Repair Patches . These patches are ideal for ultralight gear repair, in both planned maintenance and emergency fixes.
Why repair matters for ultralight / millet‑weight gear
Lightweight gear uses thinner fabrics, lighter coatings, smaller seams and less excess margin. That means:
-
A hole or tear isn’t just cosmetic—it reduces strength, thermal performance and waterproofing.
-
The surrounding fabric is under more stress (less fabric weight to absorb loads) so damage can propagate quickly.
-
Repairing promptly prevents escalation: what begins as a pinpoint hole can become a long rip.
As other expert resources note for tent fabrics: “If you only have a small rip or hole, tent repair tape will probably do the trick.”
And more broadly: “When you’ve got a hole in your tent… you can fix a hole in your tent several ways.”
While those references are for tents, the same principles apply to ultralight jackets, sleeping bags, and other gear.
Introduction to the aZengear repair patches
Before diving into the method, it’s worth noting why the aZengear patches are a smart choice:
-
They are pre‑cut, meaning you have patch shapes ready to go (no trimming required in the field if you carry the kit).
-
They are self‑adhesive, so you don’t need separate glue or seam sealer (when surface adhesion is adequate). This simplifies repair, especially on‑trail.
-
The material is described as soft, waterproof, tear‑resistant rip‑stop nylon fabric, which matches well with the kinds of shell fabrics used in ultralight gear.
-
They’re designed for clothing, sleeping bags, ski pants—and by implication for similar ultralight gear.
So, when your millet‑weight jacket or gear sheet gets a tear, you already have a tool in your kit that’s designed for the job.
Step‑by‑Step Repair Technique
Here’s how you can use the aZengear patches (or any good self‑adhesive repair patch) to fix lightweight camping gear such as jackets, sleeping bags or tents:
1. Assess the damage
-
Identify the hole, tear or puncture. Look not just at the obvious damage but around for fabric stress (ruffling, thinned spots, coating abrasion).
-
Note where the damage is: is it on a seam, zipper area, high‑stress zone (shoulder, elbow, foot‑end of sleeping bag) or flat panel? If it’s on a seam or a highly stressed location, you may need extra reinforcement (see later).
-
Take note of the environment: is the gear wet, coated in dust, or sand? These factors will affect adhesion.

2. Clean and prepare the surface
-
Ensure the fabric around the damage is dry. If wet, dry as best you can (sunlight, wipe with clean cloth, use your heat source if safe).
-
Remove debris, dust, sand—these can interfere with adhesive bonding.
-
If possible, wipe the area with a bit of rubbing alcohol or isopropyl (if you carry it) to remove oils, grime or surfactants. This improves patch adhesion.
-
Gently flatten the fabric so that the tear lies as flat as possible—not gaping, no puckering. For a tear, you may need to bring edges together so the patch sits cleanly.
-
For holes with frayed or jagged edges, consider trimming the fray (carefully) so the patch adheres smoothly.
3. Choose and apply the patch
-
From your aZengear patch kit, pick a size that overlaps the damage by at least 1.0–2.0 cm (for jackets and bags) or even more (for tents or high‑stress zones). More overlap = better grip.
-
If you are outdoors and need a quick fix, pre‑cut means you can choose the shape quickly. But ensure the patch is large enough and the shape fits the damage. Round corners are ideal because corners are prone to lifting. Many expert guides recommend rounding the patch corners for better durability.
-
Peel the backing from the patch and align it carefully over the cleaned area. Start from one side and slowly press down to avoid bubbles.
-
Use a flat object if available (a credit‑card style edge, or your hand wrapped in cloth) to press from centre outward—this ensures good contact.
-
Press firmly for a minute or two. The stronger the initial adhesion, the longer the repair will hold.
4. Reinforcement and curing
-
If the damage is in a seam, zipper area or highly stressed zone, consider reinforcing by:
-
Applying a second patch on the reverse side of the fabric (if accessible) to sandwich the tear for strength.
-
Sewing a few reinforcing stitches around the patch (if you have needle and thread) then placing the patch over the stitches to finish cleanly.
-
If the adhesive patch is used in damp or cold conditions, allow as much curing time as possible before full use. Even though self‑adhesive, cooler temperatures reduce bonding speed.
-
After application, check the patch edges: if any lift is seen, press again and hold for a bit longer to re‑adhere.
5. Test and use
-
Once applied and pressed, gently flex the area—move the gear as you would in use (e.g., raise your arms if jacket, pack the sleeping bag). Make sure the patch stays flat and doesn’t peel.
-
For waterproof gear: if you suspect water ingress, you can test with a light spray of water (if conditions allow) or inspect after next use. Make sure no moisture seeps under the patch.
-
Record the repair mentally (or note it in a gear checklist): next major wash, inspect the patch condition.
Additional Tips for Millet‑Weight / Backpacking Use
-
Carry a small repair kit: Even if you normally don’t damage gear, for multi‑day trips carry a few patches and adhesive. The aZengear patch kit is compact and covers a variety of uses.
-
Match colours or use clear: If appearance matters (for personal satisfaction), choose a patch colour close to your gear fabric or clear/transparent version (if offered). The aZengear option includes transparent patches.
-
Apply early, don’t wait: A tiny tear will worsen under load. Fix early before it becomes a major rip.
-
Avoid high‑stress zone damage where possible: For future prevention, consider reinforcing high‑wear areas (e.g., shoulders of jackets, foot ends of sleeping bags) with extra fabric backing when gear is new.
-
Pre‑treat gear before trips: Ensure your fabrics are clean and coatings intact; old or dirty coatings reduce adhesion and make tears more likely.
-
Pack gear wisely: On the trail, avoid dragging pack straps across thin shell fabrics, avoid storing down gear compressed for excessive time in damp conditions, etc. Prevention helps.
-
For tents and multi‑panel shelters: While this article centres on jackets/bags, the underlying techniques apply. For tents especially, using patches + seam sealer is standard.
-
Mind climate and conditions: Adhesives behave differently in cold and wet conditions—press longer, allow longer set time, avoid folding patched area until fully adhered.
Why the aZengear patch product stands out
-
aZengear patches delivers exactly the features needed for ultralight gear repair: soft rip‑stop nylon (compatible with many shell fabrics), waterproof backing, self‑adhesive.
-
Pre‑cut means you don’t need to carry extra scissors or fabric offcuts (though carrying a small pair of scissors is still wise).
-
The kit is versatile—designed for clothing, sleeping bags, ski pants—but equally applicable to ultralight tents, tarps, gear sacks.
-
Because it’s from the same brand channel as other camping gear, you can integrate it into your gear kit and trust compatibility with outdoor fabrics.
Repairing millet‑weight camping gear doesn’t need to be complicated—but it does require the right approach and materials. By cleaning, preparing, choosing the right patch size, pressing firmly and allowing proper adhesion, you can restore performance to your gear quickly. The aZengear self‑adhesive patch kit is a smart choice because it’s pre‑cut, designed for outdoor fabrics, and fits a range of lightweight gear use‑cases.
Next time you spot a small tear in your jacket, sleeping bag or tent, don’t let it sit. Fix it early with the right patch, and you’ll extend the life of your gear—and keep your trip on track.